Agency Admin - Custom Fields
To learn more about the Source: Inherit / Source: Own button, see Agency Admin - eLogic Network.
If you prefer video walkthroughs, see VIDEO: Agency Admin - Custom Fields.
Topics covered in this article:
- Custom Fields - The Basics
- Know Your Field Type!
- Field Description and Tooltips - The Basics
- View Custom Fields
- Create Custom Field
- Edit Custom Field Type, Name, or Description
- Edit Custom Field Response/Choice
- Delete Custom Field Response/Choice
- Delete Custom Field
- Add Custom Field to Client Intake
- Remove Custom Field from Client Intake
- Add Custom Field to Form
- Remove Custom Field from Form
Custom Fields - The Basics
Create Custom Fields to capture additional client information that is not available from in the system library. Custom Fields can be added to client intake and electronic forms and can be reported on using both Custom and Ad Hoc Reports.
Custom Fields can be created and edited in two locations:
- Agency Admin → the Agency Settings tab → Custom Fields - this is the Custom Fields homepage
- Agency Admin → the Forms tab - Custom Fields can be created on-the-fly when creating or editing a form
You can also inherit your parent group's Custom Fields by clicking the Source button to read Source: Inherit. Inherited data points help maintain data consistency across your eLogic Network, making parent-level reporting a breeze.
The steps to create and edit Custom Fields are the same between the Custom Fields homepage and Forms. This article will instruct you to navigate to the Custom Fields homepage, however the same core steps can be followed in Forms.
Know Your Field Type!
- Different Kinds of Custom Fields
- Example of Custom Fields in Client Intake
- Example of Custom Fields on a Form
eLogic Genesis offers five different kinds of Custom Fields:
-
Radio Button: Radio buttons allow one selection from multiple choices. This field type is best for five or fewer choices - example application: “Yes or No” questions
-
Checkbox: Checkboxes allow more than one selection from many choices - example application: “Check all that apply…” questions
-
Textbox: Textboxes allow for short alphanumeric entries. More than one textbox can be created in a Textbox Custom Field - example application: “How tall are you in feet?" & "How tall are you in inches?”
-
Drop-down List: Drop-down lists allow one selection from many choices. This field type is best for more than five choices - example application: “If you utilize public transportation, which route do you most commonly use?”
-
Large Textbox: Large textboxes allow for long alphanumeric entries. More than one large textbox can be created in a Large Textbox Custom Field - example application: “Please explain the previous situation.” & "Please explain the actions taken to remedy the issue."
back to Know Your Field Type! back to top
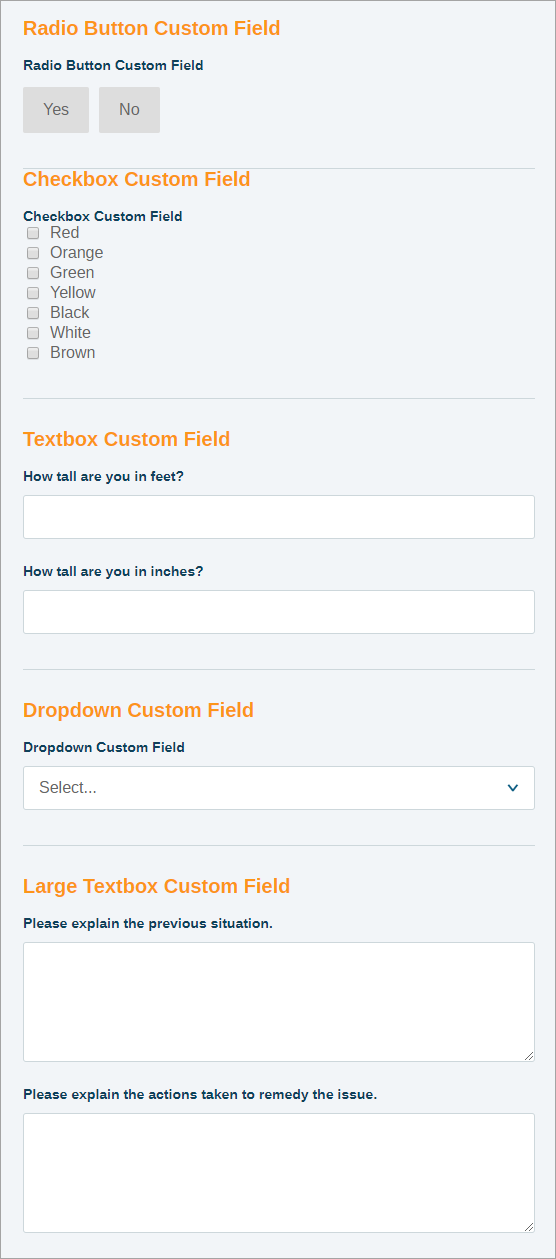
Below is an example of what each Field Type looks like on client intake:
back to Know Your Field Type! back to top
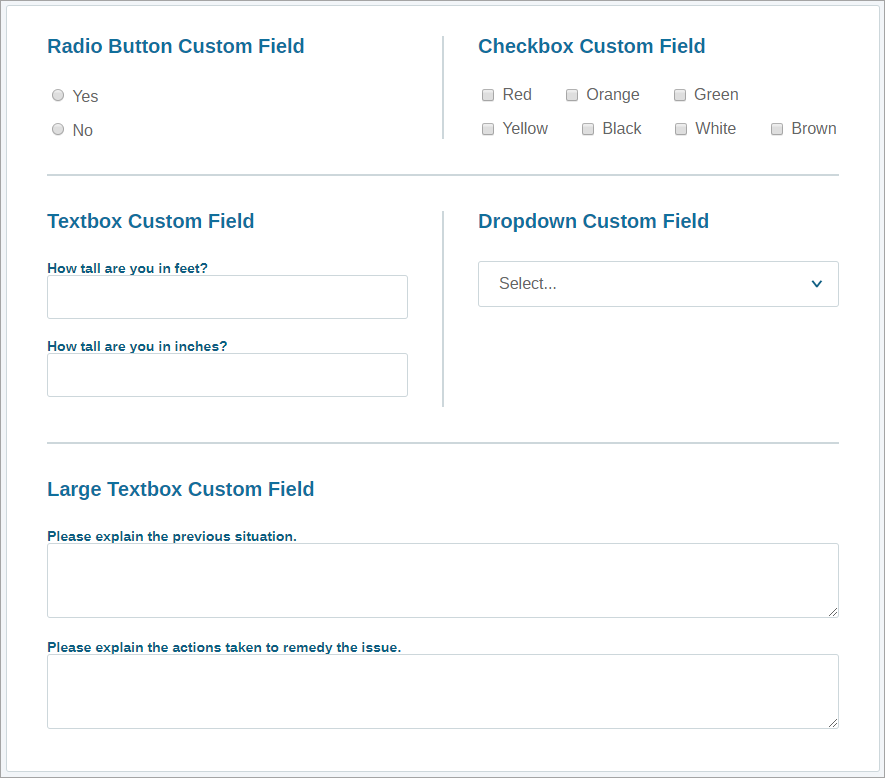
Below is an example of what each Field Type looks like on a form:
back to Know Your Field Type! back to top
Field Description and Tooltips - The Basics
Field Descriptions are an optional feature that display additional information about the Custom Field.
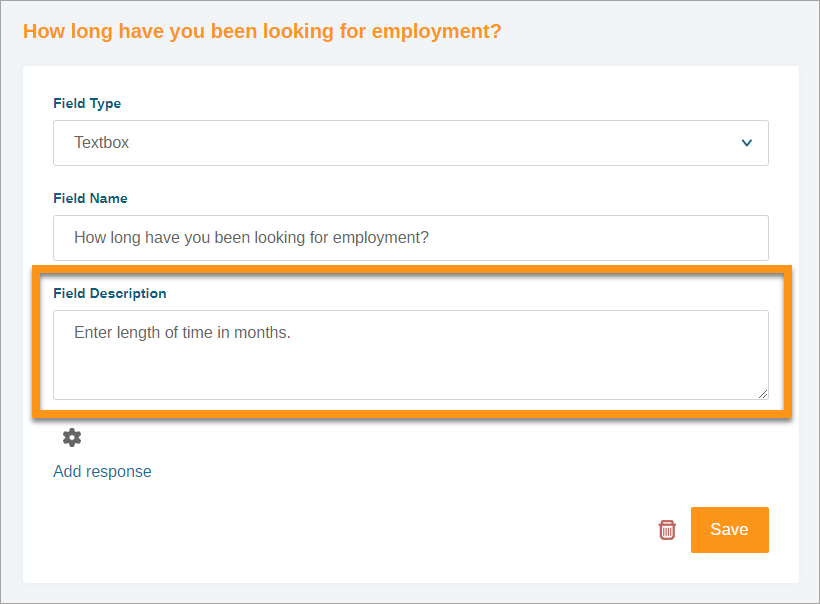
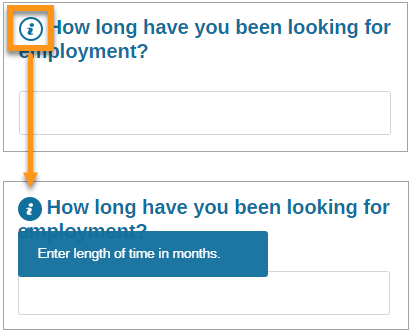
Once a Custom Field with a Field Description is added to a Form, the Description will appear as a tooltip. Tooltips present as a small ![]() icon that, when clicked, expands to display the Custom Field Description. Below is an example of a tooltip in a Form:
icon that, when clicked, expands to display the Custom Field Description. Below is an example of a tooltip in a Form:
View Custom Fields
- Click Agency Admin from the system navigation bar
- Click Agency Settings
- Click the Custom Fields tab listed on the left
- All Existing Custom Fields are listed - toggle the Source button to use Custom Fields Inherited from your organization's parent group or only Custom Fields Owned by your organization
- Locate the existing Custom Field and click the
 settings icon to see details
Create Custom Field
- Click Agency Admin from the system navigation bar
- Click Agency Settings
- Click the Custom Fields tab listed on the left
- Click Add New Field
- Select the desired Field Type
- Enter the Field Name
- Enter Field Description (optional)
- Click Save
- Click the "Add response" link - a text field will appear below
- Enter the response/choice and click Save directly to the right -
 settings will appear to the right of the response/choice and a text field will appear below
 - Repeat steps 9-10 as needed
- When all responses/choices are entered, click Save in the bottom right corner of the white custom field box
Edit Custom Field Type, Name, or Description
- Click Agency Admin from the system navigation bar
- Click Agency Settings
- Click the Custom Fields tab listed on the left
- Locate the Custom Field and click the settings icon
- Update the Field Type, Field Name, or Field Description as needed - if you wish to update a response/choice, see Edit Custom Field Response/Choice below for an important disclaimer
- Click Save in the bottom right corner of the white custom field box
Edit Custom Field Response/Choice
IMPORTANT!! Please use caution when editing Custom Field Response/Choices! If the Custom Field has been used on client intake or a Form, all historical data is stored with the corresponding response/choice slot. Editing the name of any response/choice will update the label attached to the data, not the data itself. Custom Field choices, if renamed, should have the same meaning as the original option as renaming choices to convey a different meaning, which can ruin your collected data and skew any data collected moving forward.
If edits must be made to existing Custom Field responses/choices, please be sure the context of the edits remains true to the original response/choice. Editing the choices from "A", "B", "C", and "D" to "a", "b", "c", and "d" is an acceptable change and will not influence data integrity.
If you need to replace options in your custom field, delete the existing ones and create new ones. Do not rename them.
If you have any questions regarding maintaining data integrity, please do not hesitate to contact the eLogic Team for guidance.
- Click Agency Admin from the system navigation bar
- Click Agency Settings
- Click the Custom Fields tab listed on the left
- Locate the Custom Field and click the settings icon
- Locate the response you wish to delete and click its corresponding settings icon
- Make any appropriate changes
- Click Save directly to the right
- Click Save in the bottom right corner of the white custom field box
Delete Custom Field Response/Choice
IMPORTANT!! Please use caution when deleting Custom Fields choices! If the Custom Field has been used for client intake or on a Form, all historical data is stored with the corresponding response/choice. Deleting a choice will remove the choice from the Custom Field, but any data previously entered in the deleted choice will still be shown in report results.
If you have any questions regarding maintaining data integrity, please do not hesitate to contact the eLogic Team for guidance.
- Click Agency Admin from the system navigation bar
- Click Agency Settings
- Click the Custom Fields tab listed on the left
- Locate the Custom Field and click the settings icon
- Locate the response you wish to delete and click its corresponding settings icon
- Click the
 delete icon to the far right
Delete Custom Field
IMPORTANT!! Please use caution when deleting Custom Fields! If the Custom Field has been used on client intake or a Form, all historical data is stored within the Custom Field. Deleting the Custom Field itself will remove the Custom Field from the system and all collected data.
Custom Fields can be removed from client intake and removed from Forms without deleting the collected data.
If you have any questions regarding maintaining data integrity, please do not hesitate to contact the eLogic Team for guidance.
- Click Agency Admin from the system navigation bar
- Click Agency Settings
- Click the Custom Fields tab listed on the left
- Locate the Custom Field you wish to delete and click the settings icon
- Click the delete icon to the left of the Save button
Add Custom Field to Client Intake
- Click Agency Admin from the system navigation bar
- Click Agency Settings
- Click Permissions
- Select the desired Role from the list of tabs on the left
- Click the Tabs toggle

- Directly below, click the Custom Fields button
- Enter the Custom Field name in the search bar to locate it quickly
- Click and drag the desired Custom Field to the desired tab box on the right
- Click Save
- Repeat steps 4-9 for all applicable Roles
Remove Custom Field from Client Intake
- Click Agency Admin from the system navigation bar
- Click Agency Settings
- Click Permissions
- Select the desired Role from the list of tabs on the left
- Click the Tabs toggle
- Locate the Custom Field in its corresponding tab box on the right
- Click the X in the Custom Field's rectangle
- Click Save
Add Custom Field to Form
- Click Agency Admin from the system navigation bar
- Click Forms
- Locate the Form you wish to add the Custom Field to and click Edit
- Under the Custom Fields Library on the left, locate the Custom Field you wish to add
- Click the Custom Field to add to the next available spot -OR- Click and drag the Custom Field by the
 six dots directly to the desired location on the Form
Remove Custom Field from Form
- Click Agency Admin from the system navigation bar
- Click Forms
- Locate the Form from which you wish to remove the Custom Field and click Edit
- Locate the Custom Field in the form
- Click the delete icon
- Custom Field is removed from Form
Comments
0 comments
Please sign in to leave a comment.