Agency Admin - Intake Fields
To learn more about the Source: Inherit / Source: Own button, see Agency Admin - eLogic Network.
Topics covered in this article:
- Intake Fields - The Basics
- Set Intake Field Option Source (Inherit-vs-Own)
- Add Intake Field Options
- Edit Intake Field Options
- Include Intake Field Option in Section C Report
- Show/Hide Deleted Intake Field Options
- Delete Intake Field Option Name
- Re-enable Intake Field Options
- Client Types
- Field Techs (Weatherization feature)
- Job Industries (for Job Searches)
- Work Sites (for Work Logs)
Intake Fields - The Basics
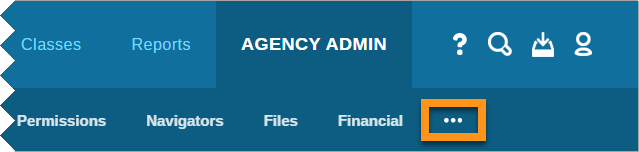
The Intake Fields tab is one of the last tabs available under Agency Admin. If you do not see this tab after clicking Agency Admin, click the three dots in the sub navigation bar to expand and display Intake Fields.
The Intake Fields tab enables Agency Admins to add, edit, and inherit options for demographic and other fields available in client records. Agency Admins can also indicate which Intake Field demographic selections will be used for Section C reporting.
In addition to demographic intake options, Agency Admins can set up Client Types, Field Techs (for Weatherization), Job Industries (for Job Searches), and Work Sites (for Work Logs) under the Intake Fields tab available under Agency Admin.
Each Intake Field also has the option to be inherited from the parent group or owned by your organization.
Set Intake Field Option Source (Inherit-vs-Own)
Inheriting Intake Field options will ensure that data is collected uniformly across your eLogic Network which makes parent-level reporting easy.
- Click Agency Admin from the system navigation bar
- Click Intake Fields
- Locate and click the desired Intake Field tab listed on the left
- Click the Source button to toggle:
- Source: Inherit will display and apply options set both in your parent group and any options created by your organization
- Source: Own will display and apply only options created by your organization
- Source selection will be saved and immediately applied to all client records
Add Intake Field Options
- Click Agency Admin from the system navigation bar
- Click Intake Fields
- Locate and click the desired Intake Field tab listed on the left
- In the text field, enter the name of the new Intake Field option
- Click Add New
- Option will appear below and be immediately available in client records
Edit Intake Field Option Name
IMPORTANT!! Please use caution when editing Intake Field Options! If the Intake Field and option has been used on client intake, all historical data is stored with the corresponding Intake Field option. Editing the name of the option will update the label attached to the data, not the data itself. Intake Field options, if renamed, should have the same meaning as the original option as renaming choices to convey a different meaning, which can ruin your collected data and skew any data collected moving forward.
If edits must be made to existing Intake Field options, please be sure the context of the edits remains true to the original option. Editing options named "A", "B", "C", and "D" to "a", "b", "c", and "d" is an acceptable change and will not influence data integrity.
If you must replace options in your intake field, delete the existing options and create new ones. Do not rename them.
If you have any questions regarding maintaining data integrity, please do not hesitate to contact the eLogic Team for guidance.
- Click Agency Admin from the system navigation bar
- Click Intake Fields
- Locate and click the desired Intake Field tab listed on the left
- Locate the Intake Field option listed on the right and click the
 settings icon
 - Change the option name as desired
- Click the
 settings icon to save
Include Intake Field Option in Section C Report
If you wish to run the Section C System Report, you must have the demographic option entered exactly as it appears on the Section C Report and indicate each demographic option to be used in the report.
- Click Agency Admin from the system navigation bar
- Click Intake Fields
- Locate and click the desired Intake Field tab listed on the left
- Locate the Intake Field option listed on the right and click the settings icon
- Click the Include on Section C checkbox
- Click the settings icon to save
Show/Hide Deleted Intake Field Options
Intake Field Options are never removed from the system completely. When an option is deleted, it will be removed from the list of active options available in client records and hidden within the Intake Field's list of options. All deleted option data collected in client records is stored and is retrievable by re-enabling the Intake Field option.
- Click Agency Admin from the system navigation bar
- Click Intake Fields
- Locate and click the desired Intake Field tab listed on the left
- Click the link near the top right corner under the Source button:
- Hide deleted options: Intake Field options that have been deleted are hidden
- Show deleted options: Intake Field options that have been deleted are shown and can be re-enabled
Delete Intake Field Options
Intake Field Options are never removed from the system completely. When an option is deleted, it will be removed from the list of active options available in client records and hidden within the Intake Field's list of options. All deleted option data collected in client records is stored and is retrievable by re-enabling the Intake Field option.
Re-enable Intake Field Options
- Click Agency Admin from the system navigation bar
- Click Intake Fields
- Locate and click the desired Intake Field tab listed on the left
- If the link near the top right corner under the Source button reads Show deleted options, continue to step 5
- If the link near the top right corner under the Source button reads Hide deleted options, click it once to read Show deleted options
- Locate the Intake Field option you wish to re-enable and click the
 redo button
 - Option is available in client records
Client Types
Client Types - The [Very] Basics
See Client Types to learn more about Client Types and recommended Client Types for Community Action Agencies. If you prefer video walkthroughs, see VIDEO: Select Client Types.
The Client Type Intake Field is a customizable status displaying how each client is categorized within the system. When running reports, these Client Types can be identified and accounted for. Each organization must first customize the Client Type options available via Agency Admin under the Intake Fields tab.
Client Types can be accessed and changed on a client's record via the drop-down list in the client information box located above the left sidebar.
back to Client Types back to top
Create Client Type
Is your organization a Community Action Agency? Please see Client Types for recommended Client Type options.
Creating Client Types is the same as adding any Intake Field option:
- Click Agency Admin from the system navigation bar
- Click Intake Fields
- Locate and click the Client Type tab from the tabs listed on the left
- In the text field, enter the name of the new Client Type
- Click Add New
- Option will appear below and be immediately available in client records
- Repeat steps 4-5 as needed
back to Client Types back to top
Field Techs
If your organization uses the Weatherization feature, Agency Admins will need to add Field Tech options to become available in the Field Tech drop-down list in client records.
Create Field Tech Options
Creating Field Tech options is the same as adding any Intake Field option:
- Click Agency Admin from the system navigation bar
- Click Intake Fields
- Locate and click the Field Tech tab from the tabs listed on the left
- In the text field, enter the name of the new Field Tech
- Click Add New
- Option will appear below and be immediately available in client records
- Repeat steps 4-5 as needed
Job Industries
Job Industries are a part of a client's Job Search & Application process, located in their record under the Employment tab.
Create Job Industry Options
Creating Job Industry options is the same as adding any Intake Field option:
- Click Agency Admin from the system navigation bar
- Click Intake Fields
- Locate and click the Industries tab from the tabs listed on the left
- In the text field, enter the name of the new job industry
- Click Add New
- Option will appear below and be immediately available in client records
- Repeat steps 4-5 as needed
Work Logs
Work Logs - The Basics
Work Logs provide an area within eLogic Genesis to document income and hours worked for non-traditional employment. With Work Logs, navigators can record which Worksites clients work, they dates they worked, the hours worked, the pay rate, and the total earned for each entry. Income earned on Work Logs are not calculated into the client's budget.
You can also inherit your parent group's Work Log Sites by clicking the Source button to read Source: Inherit. Inherited data points help maintain data consistency across your eLogic Network, making parent-level Work Log reporting a breeze.
Create Work Site Options
Creating Work Site options is the same as adding any Intake Field option:
- Click Agency Admin from the system navigation bar
- Click Intake Fields
- Locate and click the Work Sites tab from the tabs listed on the left
- In the text field, enter the name of the new Work Site
- Click Add New
- Option will appear below and be immediately available in client records
- Repeat steps 4-5 as needed
Comments
0 comments
Please sign in to leave a comment.