Employment - Standard User
Topics covered in this article:
- Employment Tab - The Basics
- Job Searches [and Job Applications] - Table of Contents
- Employment - Table of Contents
- Unemployment - Table of Contents
Employment Tab - The Basics
eLogic Genesis' Employment section is accessible in client records via the intake navigation bar → Employment. The Employment tab in client records contains powerful tools to aid navigators and clients in finding employment and documenting employment information. The Employment tab has three sections accessible via the Employment toggles:

Click the links below to read more about each feature:
- Job Searches [and Job Applications] - manage client job searches and job applications
- Employment - manage current employment(s) and employment history
- Unemployment - document periods of client unemployment
Job Applications and Job Searches - Table of Contents
- Job Applications Job Searches and - The Basics
- About the Job Applications Page
- About the Job Searches Page
- View Job Applications:
- Create Job Application
- Update Job Application Status:
- Edit Job Application:
- Link Job Application to Job Search
- Unlink or Move Job Application to Another Job Search
- Delete Job Application:
- Create Job Search
- Update Job Search Status
- Edit Job Search
- Delete Job Search
Job Applications and Job Searches - The Basics
Before a client can indicate their Job Industries of interest in the Employment tab, an Agency Administrator must first establish Job Industries via Agency Admin → Intake Fields.
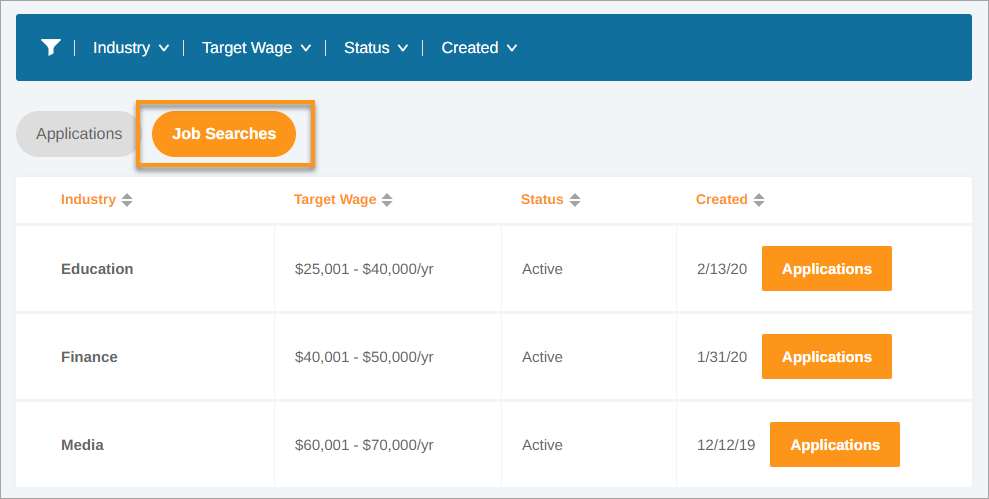
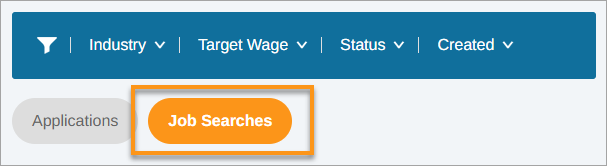
Job Searches and Applications are available in the Employment tab under the Job Searches toggle:

Job Applications (not linked to a Job Search) are managed in a separate section from Job Searches. Navigate between the two sections using the toggle buttons located below the filter bar:

Applications
The Applications section enables navigators to document clients' submitted job applications and the status of each application: Applied, Interviewed, and Hired. In each application, navigators can enter additional information about the job: Position, Type (full time, part time, or temporary), and the employer's contact information.

As the client continues their job search, the progression of each Job Application can be tracked by updating its status. When the Hired application status is selected, an Employment will be automatically generated using the information that was entered in the job application.
back to Job Searches and Applications back to top
Job Searches
Job Searches is an optional feature that makes it easy to track clients' goals while seeking employment within specific industries. Job Searches document which industry or industries a client is interested in and their desired wage range.
Multiple applications can be linked to a Job Search, which can help keep employment seeking more organized. Each Job Search can be updated with three statuses:
- Active - indicates an ongoing job search for that industry
- Complete - indicates that the client was successful in obtaining a job within that industry
- Unsuccessful - indicates that the client was not successful in obtaining a job within that industry
back to Job Applications and Job Searches - Table of Contents back to top
Job Applications Page

The Job Applications page contains a filter bar and a table that displays all documented job applications.
Filter Bar
Above the Job Applications table, you'll see a blue ![]() filter bar which contains different filters categories. Each category will expand and show different filter options when clicked. When each filter is selected or removed, the table below will display only Applications that match the filter options selected.
filter bar which contains different filters categories. Each category will expand and show different filter options when clicked. When each filter is selected or removed, the table below will display only Applications that match the filter options selected.

It may seem that some filter drop-downs display fewer options than they should. These are “smart” filters and are designed to display only options that are relevant to the Applications entered.
Once a filter option is selected, it can be removed by clicking the check box in the drop-down, clicking Clear all in the drop-down, or by clicking the grey rectangle shown under Selected Filters beneath the filter bar.
Filter Options
- Employer - filter applications by Employer name
- Position - filter applications by position
- Type - filter applications by employment type
- Status - filter applications by application status
- Created - filter applications that were created within a date range
back to Job Applications and Job Searches - Table of Contents back to top
Job Application Table and Column Headers
Easily sort applications in client records by clicking the arrows next to each column header. The arrows will sort the table in ascending/descending order according to the data in the column.

back to Job Applications and Job Searches - Table of Contents back to top
Job Searches Page

The Job Searches page contains a filter bar and a table that displays all job searches.
Filter Bar
Above the Job Searches table, you'll see a blue ![]() filter bar which contains different filters categories. Each category will expand and show different filter options when clicked. When each filter is selected or removed, the table below will display only Searches that match the filter options selected.
filter bar which contains different filters categories. Each category will expand and show different filter options when clicked. When each filter is selected or removed, the table below will display only Searches that match the filter options selected.

It may seem that some filter drop-downs display fewer options than they should. These are “smart” filters and are designed to display only options that are relevant to the Searches entered.
Once a filter option is selected, it can be removed by clicking the check box in the drop-down, clicking Clear all in the drop-down, or by clicking the grey rectangle shown under Selected Filters beneath the filter bar.
Filter Options
- Industry - filter job searches by Industry
- Target Wage - filter job searches by desired wage
- Status - filter job searches by status(es)
- Created - filter job searches that were created within a date range
back to Job Applications and Job Searches - Table of Contents back to top
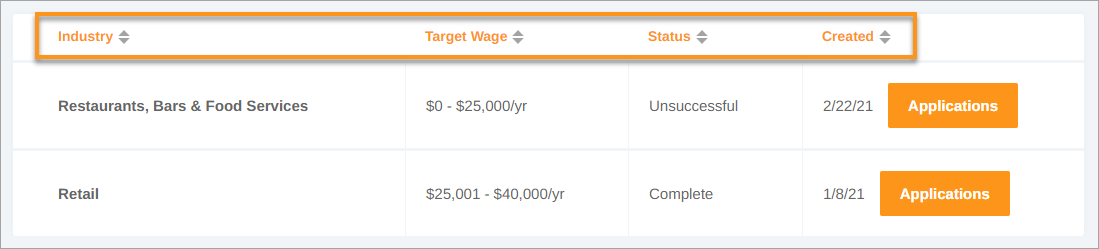
Job Searches Table and Column Headers
Easily sort job searches in client records by clicking the arrows next to each column header. The arrows will sort the table in ascending/descending order according to the data in the column.
back to Job Applications and Job Searches - Table of Contents back to top
View Job Applications Not Linked to a Job Search
- Open client record
- Select the Employment tab
- Click the Job Searches toggle
- Job Applications are shown in table below
- Hover your mouse over an application and click
 more to expand the application to view details
Don't see the Application you're looking for? Check to see if it has been linked under a Job Search
back to Job Applications and Job Searches - Table of Contents back to top
View Applications Linked to Job Search
- Open client record
- Select the Employment tab
- Click the Job Searches toggle
- Click the Job Searches
 button below the filter bar
 - Locate the existing Job Search from the table below
- Click the Applications button located in the Created column - Job Search Application History screen overlay will appear
- Job Applications are shown in table
- Hover your mouse over an application and click more to expand the application to view Application History, Contact Information, and Job Search details
back to Job Applications and Job Searches - Table of Contents back to top
Create Job Application
- Open client record
- Select the Employment tab
- Click the Job Searches toggle
- Click Add Application in the top right corner
- Type the name of the Employer in the text field - If employer is already in the system, you must select it from the drop-drop down list. If employer is not in the system, no drop-down will appear and you can continue application creation
- Select the applicable Job Search from the drop-down list (optional)
- Select the employment Type from the drop-down list
- Click Add Application
- If:
- Application was not linked to a job search, it is displayed in the table below
- Applications was
 linked to a job search, you can view it in the Job Searches section
back to Job Applications and Job Searches - Table of Contents back to top
Update Job Application Status - Not linked to a Job Search
- Open client record
- Select the Employment tab
- Click the Job Searches toggle
- Locate and hover your mouse over the application in the table below
- Click more to expand
- In the
 Application History box, select New Application Status from drop-down list and enter the Date it occurred
 - Click Add Status
- Click Save Changes
- Status is added under Application History (click more again to view)
Job Applications saved with the "Hired" status will automatically create the employment under the Employment toggle.
back to Job Applications and Job Searches - Table of Contents back to top
Update Job Application Status -  Linked to a Job Search
- Open client record
- Select the Employment tab
- Click the Job Searches toggle
- Click the Job Searches button below the filter bar
- Locate the Job Search that contains the Application in the table below
- Click the Applications button located in the Created column - Job Search Application History screen overlay will appear
- Hover your mouse over the application and click more to expand
- In the Application History box, select New Application Status from drop-down list and enter the Date it occurred
- Click Add Status
- Click Save Changes
- Status is added under Application History (click more again to view)
- Click the X in the top right corner or ← Back to all job searches to return to Job Searches
Job Applications saved with the "Hired" status will automatically create the employment under the Employment toggle.
back to Job Applications and Job Searches - Table of Contents back to top
Edit Job Application - Not Linked to a Job Search
- Open client record
- Select the Employment tab
- Click the Job Searches toggle
- Locate and hover your mouse over the application in the table below
- Click more to expand
- Edit Position and Type by clicking the fields in the Application's row
- Update Application History,
 Contact Information, and/or Job Search linkages by selecting the sub-menu option
 - Make any relevant changes
- Click Save Changes
back to Job Applications and Job Searches - Table of Contents back to top
Edit Job Application - Linked to a Job Search
- Open client record
- Select the Employment tab
- Click the Job Searches toggle
- Click the Job Searches button below the filter bar
- Locate the Job Search that contains the Application in the table below
- Click the Applications button located in the Created column - Job Search Application History screen overlay will appear
- Locate and hover your mouse over the application in the table below
- Click more to expand
- Edit Position and Type by clicking the fields in the Application's row
- Update Application History, Contact Information, and/or Job Search linkages by selecting the sub-menu option
- Make any relevant changes
- Click Save Changes
- Click the X in the top right corner or ← Back to all job searches to return to Job Searches
back to Job Applications and Job Searches - Table of Contents back to top
Link Job Application to Job Search
You must create a Job Search prior to linking an application to it.
- Open client record
- Select the Employment tab
- Click the Job Searches toggle
- Locate and hover your mouse over the application in the table below
- Click more to expand
- Click Job Search
- Click
 Add link to job search
 - Select the desired Job Search from the Linked Job Search drop-down list
- Click Save Changes
back to Job Applications and Job Searches - Table of Contents back to top
Unlink or Move Job Application to Another Job Search
- Open client record
- Select the Employment tab
- Click the Job Searches toggle
- Click the Job Searches button below the filter bar
- Locate the Job Search that contains the Application in the table below
- Click the Applications button located in the Created column - Job Search Application History screen overlay will appear
- Locate and hover your mouse over the application in the table below
- Click more to expand
- Click Job Search
- To unlink the Job Application - click
 Remove job search link
 - To move Job Application to another Job Search - click the Linked Job Search drop-down list and select desired Job Search
- To unlink the Job Application - click
- Click Save Changes
- Unlinked Job Application is accessible in the Applications
 table
table - Moved Job Application is accessible under the Job Search
- Unlinked Job Application is accessible in the Applications
back to Job Applications and Job Searches - Table of Contents back to top
Delete Job Application - Not Linked to a Job Search
- Open client record
- Select the Employment tab
- Click the Job Searches toggle
- Locate and hover your mouse over the application in the table below
- Click the delete icon
- After the delete icon turns into a
 redo icon, that is your verification that the application has been deleted and will disappear once you leave the page
 - If you wish to undo the delete, click the redo button
- After the delete icon turns into a
back to Job Applications and Job Searches - Table of Contents back to top
Delete Job Application - Linked to a Job Search
- Open client record
- Select the Employment tab
- Click the Job Searches toggle
- Click the Job Searches button below the filter bar
- Locate the Job Search that contains the Application in the table below
- Click the Applications button located in the Created column - Job Search Application History screen overlay will appear
- Locate and hover your mouse over the application in the table below
- Click the delete icon
- After the delete icon turns into a redo icon, that is your verification that the application has been deleted and will disappear once you leave the page
- If you wish to undo the delete, click the redo button
- After the delete icon turns into a
back to Job Applications and Job Searches - Table of Contents back to top
Create Job Search
- Open client record
- Select the Employment tab
- Click the Job Searches toggle
- Click Add Search in the top right corner
- Select the desired Target Industry from the drop-down list
- Select the desired Target Wage from the drop-down list
- Click Add Job Search
- Job Search is added to the Job Searches section, accessible below the filter bar:
back to Job Applications and Job Searches - Table of Contents back to top
Update Job Search Status
- Open client record
- Select the Employment tab
- Click the Job Searches toggle
- Click the Job Searches button below the filter bar
- Locate and click the name of the existing Job Search from the list below
- Click the Status drop-down list in that row
- Select desired Status from list
- Click Save Changes
back to Job Applications and Job Searches - Table of Contents back to top
Edit Job Search
- Open client record
- Select the Employment tab
- Click the Job Searches toggle
- Click the Job Searches button below the filter bar
- Locate and click the name of the existing Job Search from the list below
- Click the Target Industry and/or Target Wage drop-down list(s)
- Make desired changes
- Click Save Changes
back to Job Applications and Job Searches - Table of Contents back to top
Delete Job Search
Deleting a Job Search that has linked a Job Application(s) will also delete the Application(s). If you wish to keep the Job Application(s), but delete the Job Search, unlink or move the Application(s) to another Job Search first.
- Open client record
- Select the Employment tab
- Click the Job Searches toggle
- Click the Job Searches button below the filter bar
- Hover your mouse over the Job Search you wish to remove
- Click the delete icon
- After the delete icon turns into a redo icon, that is your verification that the job search has been deleted and will disappear once you leave the page
- If you wish to undo the delete, click the redo button
- After the delete icon turns into a
back to Job Applications and Job Searches - Table of Contents back to top
Employment - Table of Contents
- Employment - The Basics
- About the Employment Page
- View Employments
- Create New Employment
- Enter/Edit Basic Employment Information
- Enter/Edit Employment Details
- Enter Employment Wage Information
- Enter/Edit Employment Benefits
- End an Employment
- Revert Ended Employment to Ongoing/Current Employment
- Delete Employment
- Delete Employment Wage Information
- Remove Employment Benefits
Employment - The Basics
The Employment toggle under the Employment tab displays all of the client's current and previous employments entered into their eLogic Genesis record.
Employments that have the following information entered are considered "Valid" for reporting purposes:
- Employer
- Hire Date
- at least one entered Wage History, which includes:
- Hourly Wage
- Hours per Week
- Effective Date
If your organization has enabled the "Count Employment Wage as Income" feature enabled, all Current Employment wages will be automatically calculated on the client's Budget page.
If an Employment has a Separation Date entered, it will automatically be moved to the Previous Employment toggle.
back to Employment - Table of Contents back to top
About the Employment Page
The Employment page contains a filter bar and a table that displays all documented employments.
Filter Bar
Above the Employment table, you'll see a blue ![]() filter bar which contains different filters categories. Each category will expand and show different filter options when clicked. When each filter is selected or removed, the table below will display only Employments that match the filter options selected.
filter bar which contains different filters categories. Each category will expand and show different filter options when clicked. When each filter is selected or removed, the table below will display only Employments that match the filter options selected.

It may seem that some filter drop-downs display fewer options than they should. These are “smart” filters and are designed to display only options that are relevant to the Applications entered.
Once a filter option is selected, it can be removed by clicking the check box in the drop-down, clicking Clear all in the drop-down, or by clicking the grey rectangle shown under Selected Filters beneath the filter bar.
Filter Options
- Employer - filter employments by Employer name
- Type - filter employments by employment type
- Status - filter employments by status(es)
- Industry - filter employments by Industry(ies)
- Shift - filter employments by shift(s)
- Hire Date - filter for employments that began within a date range
- Date Left - filter for employments that ended within a date range
Employment Table and Column Headers
Easily sort employments in client records by clicking the arrows next to each column header. The arrows will sort the table in ascending/descending order according to the data in the column.

back to Employment - Table of Contents back to top
View Employments
- Open client record
- Select the Employment tab
- All current and previous employments are shown in table below
- Hover your mouse over an employment and click more to expand
- Move between the
 Employment Details,
  Wages, and
  Benefits sub-menu options for details
- Move between the
back to Employment - Table of Contents back to top
Create New Employment
If Employment was automatically created via Job Application status "Hired", employment will be accessible in the Employment table. All relevant information entered in the Job Application will be transferred to the new Current Employment.
- Open client record
- Select the Employment tab
- Click Add Employment in the top right corner
- Enter the name of the Employer in the text field - If employer is already in the system, you must select it from the drop-drop down list. If employer is not in the system, no drop-down will appear and you can continue adding the employment.
- Select the employment Type from the drop-down list
- Click Add Employment
- Employment is added to table below
back to Employment - Table of Contents back to top
Enter/Edit Basic Employment Information
- Open client record
- Select the Employment tab
- Hover your mouse over the employment and click more to expand
- Update basic employment information by clicking the fields in the employment's row:
- Type - select if employment is Full Time, Part Time, or Temporary
- Status - this field will update to Ended if Date Left is entered
- Industry - (optional) select if employment is associated to an Industry; an Agency Administrator must first establish Job Industries for Industry options to be available
- Shift - indicate if an employment is a First, Second, or Third shift
- Hire Date - enter the date the employment began
- Date Left - (previous employments only) enter the date the employment ended
- Click Save Changes when finished
back to Employment - Table of Contents back to top
Enter/Edit Employment Details
- Open client record
- Select the Employment tab
- Hover your mouse over the employment and click more to expand
 Employment Details are shown below:
- Site (optional) - enter employment site/location if desired
- Agency Assisted - select this checkbox if your organization assisted in obtaining the client's employment
-
Contact - enter name of the employment's point of contact
-
Phone - enter employment's point of contact phone number
-
Supervisor - enter employment's supervisor name
-
Supervisor Phone - enter employment's supervisor phone number
- Click Save Changes when finished
back to Employment - Table of Contents back to top
Enter Employment Wage Information
- Open client record
- Select the Employment tab
- Hover your mouse over the employment and click more to expand
- Select the Wages sub-menu option
- In the Wages box, enter:
- New Hourly Wage - enter the hourly wage
- Hours Per Week - enter the hours worked per week
- Position - type the client's position
- Position change - indicate if the wage associated with the position is:
- Lateral - select if client changed titles but wage is the same as previous
- Promotion - select if client received a higher wage than the previous
- Initial - select if this is the first wage amount paid for this employment
- Demotion - select if client received a lower wage than the previous
- Effective Date - enter when the wage begin
- Click Add New Wage/Position
- Wage information appears under Wage History below
- Click Save Changes when finished
back to Employment - Table of Contents back to top
Enter/Edit Employment Benefits
- Open client record
- Select the Employment tab
- Hover your mouse over the employment and click more to expand
- Select the Benefits sub-menu option
- Indicate which Employment Benefits the client's position offers by selecting the corresponding checkbox
- Enter the Effective Date for each selected benefit (optional)
- Click Save Changes when finished
back to Employment - Table of Contents back to top
End an Employment
- Open client record
- Select the Employment tab
- Hover your mouse over the employment that has ended and click more to expand
- In the Date Left column, enter the date the employment ended
- In
 Employment Details below, select the Separation Reason from the drop-down list
 - Click Save Changes
back to Employment - Table of Contents back to top
Revert Ended Employment to Ongoing/Current Employment
- Open client record
- Select the Employment tab
- Hover your mouse over the ended employment and click more to expand
- Click the employment's Date Left field
- Using your keyboard, delete the month/day/year so it reads "mm/dd/yyyy"
- Click the Separation Reason Drop down and choose "Select..."
- Click Save Changes
back to Employment - Table of Contents back to top
Delete Employment
- Open client record
- Select the Employment tab
- Hover your mouse over the employment
- Click the delete icon
- After the delete icon turns into a redo icon, that is your verification that the employment has been deleted and will disappear once you leave the page
- If you wish to undo the delete, click the redo button
- After the delete icon turns into a
back to Employment - Table of Contents back to top
Delete Employment Wage Information
Saved employment Wages cannot be edited. If you need to edit a previously entered wage, reenter the wage and backdate the entry, then delete the original.
- Open client record
- Select the Employment tab
- Hover your mouse over the employment and click more to expand
- Select the Wages sub-menu option
- In the Wages box, locate the wage to be deleted under Wage History
- Click the delete icon
- After the delete icon turns into a redo icon, that is your verification that the employment wage has been deleted and will disappear once you leave the page
- If you wish to undo the delete, click the redo button
- After the delete icon turns into a
back to Employment - Table of Contents back to top
Remove Employment Benefits
- Open client record
- Select the Employment tab
- Hover your mouse over the employment and click more to expand
- Select the Benefits sub-menu option
- Locate the benefit(s) you wish to remove
- Delete the Effective Date(s)
- Deselect the benefit checkbox(s)
- Click Save Changes when finished
back to Employment - Table of Contents back to top
Unemployment - Table of Contents
- Unemployment - The Basics
- About the Unemployment Page
- View Unemployments
- Create Unemployment
- Edit Basic Unemployment Information
- Enter/Edit Unemployment Benefits
- Delete Unemployment
Unemployment - The Basics
The Unemployment toggle under the Employment tab displays all of the client's current and previous unemployments entered into their eLogic Genesis record.

Unemployment entries document the Start Date, End Date, Reason for Unemployment, and Unemployment Benefit information. All unemployment data is reportable using an Employment type Custom Report.
back to Unemployment - Table of Contents back to top
About the Unemployment Page
The Unemployment page contains a filter bar and a table that displays all documented unemployments.
Filter Bar
Above the Unemployment table, you'll see a blue ![]() filter bar which contains different filters categories. Each category will expand and show different filter options when clicked. When each filter is selected or removed, the table below will display only unemployments that match the filter options selected.
filter bar which contains different filters categories. Each category will expand and show different filter options when clicked. When each filter is selected or removed, the table below will display only unemployments that match the filter options selected.

It may seem that some filter drop-downs display fewer options than they should. These are “smart” filters and are designed to display only options that are relevant to the unemployments entered.
Once a filter option is selected, it can be removed by clicking the check box in the drop-down, clicking Clear all in the drop-down, or by clicking the grey rectangle shown under Selected Filters beneath the filter bar.
Filter Options
- Start Date - filter for unemployments that began within a date range
- End Date - filter for unemployments that ended within a date range
- Reason - filter unemployments by reason for unemployment
- Benefits - filter unemployments that do or do not have unemployment benefits
Unemployment Table and Column Headers
Easily sort unemployments in client records by clicking the arrows next to each column header. The arrows will sort the table in ascending/descending order according to the data in the column.

back to Unemployment - Table of Contents back to top
View Unemployments
- Open client record
- Select the Employment tab
- Click the Unemployment toggle
- All documented Unemployments are shown in the table below
- Hover your mouse over the unemployment and click more to expand for details
back to Unemployment - Table of Contents back to top
Create Unemployment
- Open client record
- Select the Employment tab
- Click the Unemployment toggle
- Click Add Unemployment in the top right corner
- Enter the unemployment Start Date, End Date (if applicable), and select the Reason for unemployment from the drop-down list
- Click Add Unemployment
- Unemployment is added to the table
back to Unemployment - Table of Contents back to top
Edit Basic Unemployment Information
- Open client record
- Select the Employment tab
- Click the Unemployment toggle
- Hover your mouse over the desired unemployment and click more
- Update basic unemployment information by clicking the fields in the employment's row:
- Start Date - enter the date the unemployment began
- End Date - (if the client is no longer unemployed) enter the date the unemployment ended
- Reason - select the reason for unemployment from the drop-down list
- Status - this field will update to Ended if Date Left is entered
- Click Save Changes when finished
back to Unemployment - Table of Contents back to top
Enter/Edit Unemployment Benefits
- Open client record
- Select the Employment tab
- Click the Unemployment toggle
- Hover your mouse over the desired unemployment and click more
 Unemployment Benefits are shown below
- Select the Receiving Unemployment Benefits? checkbox
- Enter Amount Received (Weekly), Benefits Start date (if known), Benefits End date (if known)
- Click Save Changes when finished
back to Unemployment - Table of Contents back to top
Delete Unemployment
- Open client record
- Select the Employment tab
- Click the Unemployment toggle
- Hover your mouse over the unemployment
- Click the delete icon
- After the delete icon turns into a redo icon, that is your verification that the unemployment has been deleted and will disappear once you leave the page
- If you wish to undo the delete, click the redo button
- After the delete icon turns into a
back to Unemployment - Table of Contents back to top
Comments
0 comments
Please sign in to leave a comment.