Programs and Applications - Standard User
Topics covered in this article:
- Programs and Applications Tab - The Basics
- Applications - Table of Contents
- Programs - Table of Contents
Programs and Applications Tab - The Basics
The Programs/Applications tab will be named differently for different users based on their Role Permissions as set by an Agency Administrator:
- Programs: you have access to programs, but not applications
- Applications: you have access to applications, but not programs
- Programs/Apps: you have access to both programs and applications
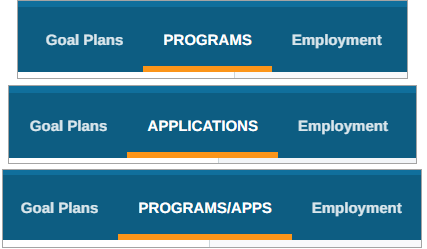
eLogic Genesis' Programs and Applications sections are accessible in client records via the intake navigation bar → Programs/Applications.
If you have access to both Programs and Applications, you will see two toggles available that will bring you to each section:

Click the links below to learn more about each feature:
- Applications - manage client program applications
- Programs - manage programs in which clients are enrolled
Program Applications - Table of Contents
- Program Applications - The Basics
- About the Program Applications Page
- Eligibility Calculator
- Create Program Application
- Add/Edit Basic Program Application Information
- Fill Out Program Application
- Check Program Application Progress
- View Program Application Timeline
- Approve/Deny Program Application
- Delete Program Application
Program Applications - The Basics
eLogic Genesis' Program Application feature is accessible in client records via the → Programs/Applications tab. Program applications help guide staff and clients to specific programs for which the client may qualify. The Applications section can be a helpful tool in collecting client information that can assist in determining program eligibility.
Applications can have up to six required data areas: Demographics, Assessments, Forms, Employment, Budget, and Files. Agency Admins must select what data is required for the Application to be considered complete. This required data must be entered in the client record before the client can enroll in the program.
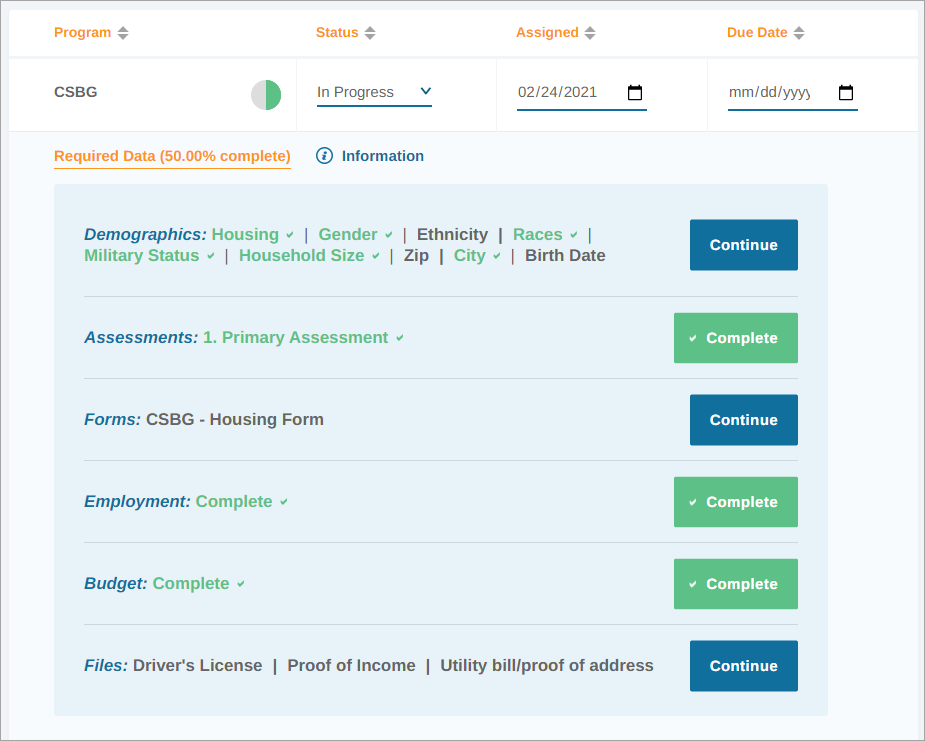
In the example above, we can see that the client record has 50% of the Required Data for the CSBG program completed ![]() .
.
If enabled, clients can apply for select programs via the eLogic Genesis Client Portal. When a client creates an application and begins fulfilling required data areas, their record is updated in real time and will alert all assigned navigators when they submit it for review.
back to Program Applications - Table of Contents back to top
Program Applications Page
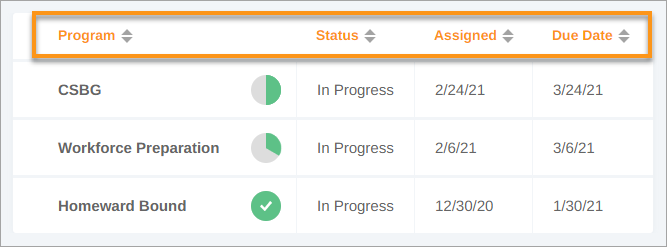
The Program Applications page contains a filter bar and a table that displays all documented job applications.
Filter Bar
Above the Program Applications table, you'll see a blue ![]() filter bar which contains different filters categories. Each category will expand and show different filter options when clicked. When each filter is selected or removed, the table below will display only applications that match the filter options selected.
filter bar which contains different filters categories. Each category will expand and show different filter options when clicked. When each filter is selected or removed, the table below will display only applications that match the filter options selected.

It may seem that some filter drop-downs display fewer options than they should. These are “smart” filters and are designed to display only options that are relevant to the Applications created.
Once a filter option is selected, it can be removed by clicking the check box in the drop-down, clicking Clear all in the drop-down, or by clicking the grey rectangle shown under Selected Filters beneath the filter bar.
Filter Options
- Program - filter applications by program name
- Status - filter applications by status(es)
- Assigned - filter applications by status(es)
- Due Date - filter for applications by due date
Program Applications Table and Column Headers
Easily sort program applications in client records by clicking the arrows next to each column header. The arrows will sort the table in ascending/descending order according to the data in the column.
back to Program Applications - Table of Contents back to top
Eligibility Calculator
Enroll client in a Program via Eligibility Calculator
- Open client record
- Click the Programs tab
- Click Eligibility Calculator near the top right corner - a screen overlay will appear.
- If the client meets the eligibility requirements set in the Eligibility Calculator, their program options will be displayed under Eligible Programs
- Click the name of the Eligibility Calculator to expand
- Eligibility requirements and list of applicable programs will be displayed
- Select the checkbox next to each program you wish to enroll the client
- Repeat with other Eligibility Calculators as needed
- Click Assign Program
- Program is added to client record
back to Program Applications - Table of Contents back to top
Create Program Application
- Open client record
- Select the Applications tab
- Click the Applications toggle
- Click Create Application in the the top right corner
- Click the Available Programs drop-down and select the desired application(s)
- Click Create Applications
- Program application(s) are added to the table below
back to Program Applications - Table of Contents back to top
Add/Edit Basic Program Application Information
- Open client record
- Select the Applications tab
- Click the Applications toggle
- Locate the application in the table below
- Hover your mouse over the application and click
 more to expand
 - Edit Status, Assigned, and Due Date by clicking the fields in the Application's row
- Click Save Changes
back to Program Applications - Table of Contents back to top
Fill Out Program Application
- Open client record
- Select the Applications tab
- Click the Applications toggle
- Locate the application in the table below
- Hover your mouse over the application and click more to expand
- Click the Continue button to navigate to that section of the client record to complete any missing required data:
- Demographics - Intake page has information entered for each required intake field
- Assessments - left sidebar
 Assessment → Assessments, required assessment has been conducted and finalized
 - Forms - Forms tab has required form filled out and finalized
- Employment - Employment tab has a valid, current employment
- Budget - left sidebar
 Budget → "Income" page has information entered
 - Files - left sidebar
 Files → indicate Req. File (Application)
- When all required information has been entered, the program application's progress
 circle will be updated to a completed
  circle - you may need to refresh your page to see the update
back to Program Applications - Table of Contents back to top
Check Program Application Progress
- Open client record
- Select the Applications tab
- Click the Applications toggle
- Locate the application in the table below
- The progress circle
 next to the program name will display the percentage of required information that has been satisfied
 - Hover your mouse over the application and click more to expand
- Under Required Data below:
- Needed required information will be in grey text and will have a blue Continue button
- Satisfied required information will be in green text with a check mark
 and a green Complete button
back to Program Applications - Table of Contents back to top
View Program Application Timeline
The Program Application Timeline displays changes to the application's status by showing the date and time the status was updated, what it was updated to, and who made the update.
- Open client record
- Select the Applications tab
- Click the Applications toggle
- Locate the application in the table below
- Hover your mouse over the application and click more to expand
- Click the
 Timeline sub-menu option
 - Application's status updates are shown below
back to Program Applications - Table of Contents back to top
Approve/Deny Program Application
Important note: if your organization has enabled program applications through the Client Portal, approving or denying the application will send a notification to the client.
- Open client record
- Select the Applications tab
- Click the Applications toggle
- Locate the completed application in the table below
- Hover your mouse over the application and click more to expand
- Click the Status drop-down
- Select Approved or Denied
- Click Save Changes
back to Program Applications - Table of Contents back to top
Delete Program Application
- Open client record
- Select the Applications tab
- Click the Applications toggle
- Locate and hover your mouse over the application you wish to delete in the table below
- Click the
 delete icon
- After the delete icon turns into a
 redo icon, that is your verification that the application has been deleted and will disappear once you leave the page
 - If you wish to undo the delete, click the redo button
- After the delete icon turns into a
back to Program Applications - Table of Contents back to top
Programs - Table of Contents
- Programs - The Basics
- About the Programs Page
- View Programs
- Enroll Client in a Program
- Add/Edit Basic Program Information
- Add/Edit Program Details
- Delete Program from Record
Programs - The Basics
eLogic Genesis' Programs feature is accessible in client records via the → Programs/Applications tab. This is where clients can be enrolled in your organization's programs. Clients can be enrolled in a Program directly or after their program application has been approved. When a client is enrolled in a program, the assigning navigator's name will appear in the bottom left corner of the  Program Details section.
back to Programs - Table of Contents back to top
Programs Page
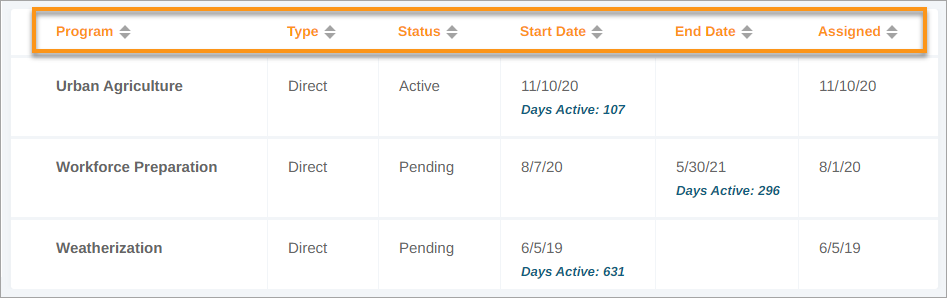
The Programs page contains a filter bar and a table that displays all documented job applications.
Filter Bar
Above the Programs table, you'll see a blue ![]() filter bar which contains different filters categories. Each category will expand and show different filter options when clicked. When each filter is selected or removed, the table below will display only programs that match the filter options selected.
filter bar which contains different filters categories. Each category will expand and show different filter options when clicked. When each filter is selected or removed, the table below will display only programs that match the filter options selected.

It may seem that some filter drop-downs display fewer options than they should. These are “smart” filters and are designed to display only options that are relevant to the programs entered.
Once a filter option is selected, it can be removed by clicking the check box in the drop-down, clicking Clear all in the drop-down, or by clicking the grey rectangle shown under Selected Filters beneath the filter bar.
Filter Options
- Program - filter by program name
- Type - filter programs by type
- Status - filter programs by current status
- Start Date - filter for programs that began within a date range
- End Date - filter for programs that ended within a date range
- Assigned - filter for programs that were assigned within a date range
Programs Table and Column Headers
Easily sort programs in client records by clicking the arrows next to each column header. The arrows will sort the table in ascending/descending order according to the data in the column.
back to Programs - Table of Contents back to top
View Programs
- Open client record
- Select the Programs tab
- All current and ended programs are shown in table below
- Hover your mouse over a program and click more to expand
- Program Details are shown below
back to Programs - Table of Contents back to top
Enroll Client in a Program
- Open client record
- Select the Programs tab
- Click Add Program(s) in the top right corner
- Click the Program(s) drop-down and select the desired programs(s)
- Click Add Program(s)
- Program(s) are added to the table below
back to Programs - Table of Contents back to top
"No Program Available" Checkbox
If your agency does not offer programs that are appropriate for the client, select the "No Program Available" checkbox. When this checkbox is selected, no new program assignments can be made in the client record.
Deselect the checkbox to assign programs.
back to Programs - Table of Contents back to top
Add/Edit Basic Program Information
- Open client record
- Select the Programs tab
- Hover your mouse over a program and click more to expand
- Update basic program information by clicking the fields in the program's row:
- Type
- Status
- Start Date
- End Date
- Assigned date
- Click Save Changes when finished
back to Programs - Table of Contents back to top
Add/Edit Program Details
- Open client record
- Select the Programs tab
- Hover your mouse over a program and click more to expand
- Program Details are shown below - enter or edit information as needed
- Site
- Hours
- Cost
- Checkup Date
- Click Save Changes when finished
back to Programs - Table of Contents back to top
Delete Program From Record
- Open client record
- Select the Programs tab
- Hover your mouse over the program you wish to delete in the table below
- Click the delete icon
- After the delete icon turns into a redo icon, that is your verification that the program has been deleted and will disappear once you leave the page
- If you wish to undo the delete, click the redo button
- After the delete icon turns into a
back to Programs - Table of Contents back to top
Comments
0 comments
Please sign in to leave a comment.