Agency Admin - Roles and Permissions
If you prefer video walkthroughs, see VIDEO: Agency Admin - Roles and Permissions.
Topics covered in this article:
- Roles and Permissions - The Basics
- Building Roles and Permissions - Tips to Get Started
- Role Permissions and What They Do
- Intake Tabs and What They Do
- Roles and Limited Access
- Building a Role and Setting Permissions From Scratch
- Copy Settings from Existing Role to Another Role
- Assign Navigator(s) to Role
- Unassign Navigator(s) from Role
- Delete Role
Roles and Permissions - The Basics
The purpose of roles is to allow a way to assign a group of permissions to multiple people at once. Agency administrators select which staff members can see and interact with which eLogic Genesis features and client data by creating roles and assigning each role various permissions. Properly established Roles and Permissions ensure that client privacy and HIPAA compliance are maintained.
Roles are the categories that your agency administrator has created for staff members in your organization (i.e.: Caseworker, Employment Specialist, Receptionist, Intake Specialist). Staff members in each role can have access to different client intake tabs and various features throughout eLogic Genesis. Depending on your organization's needs, you may only require one role be created for all staff members or you may require one role for each staff member. The types and number of roles is determined by how similar or different your organization’s staff member's day-to-day responsibilities are.
Properly established roles ensure that staff members can see and interact with only client data and features that are relevant to their role. Agency administrators, by default, have access to every feature and all data points in eLogic Genesis.
Permissions are the features within eLogic Genesis to which each Role has access (i.e.: Assessments, Budget, Client Interaction Logs, Family Management). Granting or revoking Permissions to features is as easy as selecting or deselecting the corresponding Permission's checkbox.
It is critical that each Role has access to only the applicable features as their position requires.
When creating each Role, always keep in mind that each staff member you assign are on a “need to know” basis. If a feature or function does not pertain to the Role, that Role should not be granted access.
Please Note: Staff members must first be assigned a role before they are able to log into their eLogic Genesis account.
Building Roles and Permissions - Tips to Get Started
Agency Admins, by default, have access to every feature and all data points in eLogic Genesis and do not need to be assigned a Role.
Determine how many Roles your organization requires and what they will be named. Roles are typically named after different staff positions. There are no limits to the number of Roles created.
When you begin creating your organization's Roles, we highly recommend that you start building the Role that will have the most access to eLogic Genesis' features and client data (this may be a Caseworker or Lead Caseworker Role). Role settings from an existing Role can be copied to a new Role, making it easy to create and modify new subsequent Roles. Using this approach will help to ensure uniformity across Intake tabs.
It is important that each staff members' eLogic Genesis account be created prior to Role creation. This will make it easy to assign staff members upon completion of each Role.
Role Permissions and What They Do
The first page you will see when you navigate to the Permissions tab is the Role Settings page. This page contains the Role Permissions to enable or disable various features for that Role within eLogic Genesis. If the checkbox next to the Role Permission is selected, the current Role will have access to that feature; if the checkbox is not selected, the current Role will not have access to that feature.
The list of available Role Permissions are defined as follows:
- Applications - access to Program Applications tab in client records
- Assessments - access to the Assessments section in client records
- Budgets - access to the Budget section in client records
- Case Numbers - ability to change client record/case numbers
- Classes - access to the Classes feature, located in the system navigation bar
- Client Account Invitations - able to send existing clients an invitation to use the Client Portal
- Client Global Invitation Management - access to the Global Invitation Waitlist (will also receive notifications when individuals want to create an organization-specific record in your system)
- Client Program Application Management - access to program Waitlists; receives notifications on program application updates for all clients
- Client Reports - access to the Reports section in client record
- Contacts - access to the Contacts section in client records
- Delete Clients - able to delete client records
- Education - access to the Budget section in client records
- Employments - access to the Employment tab in client records
- Family - access to the Family section in client records
- Files - access to the Files section in client records
- Forms - access to the Forms tab in client records
- Groups - access to the Groups section available via the People Page
- Notes - access to the Notes section in client records
- Programs - access to the Programs tab in client records
- Quick Goal Plans - access to the Goal Plans tab in client record
- Referrals - access to the Referrals section in client records
- Report Management - access to create, edit, delete, and otherwise manage Reports, located in the system navigation bar
- Report Viewing - access to only run Reports, located in the system navigation bar
- Schedule - access to the Schedule section in client records
- Services - access to the Services tab and Scale Services in client records
- Trainings - access to the Trainings tab in client records
- Weatherization - access to the Weatherization tab in client records
Intake Tabs and What They Do
Roles can have more than one custom created intake tab. All intake tabs will be accessible in client records via the intake navigation bar and will be placed on the far left of the bar, before the "Application" tab. It is common for organizations to have multiple tabs for multiple intake purposes (Intake, Housing, Military, Health, etc), however multiple tabs are not required.
The client intake page(s) can be set up differently for each Role. For example, an intake specialist may only need access to basic client demographics and general information (access to a single tab called "Intake") whereas a Mental Health Specialist may also need access to the client's demographic and health information (access to multiple tabs, "Intake" and "Health").
Roles and Limited Access
Roles can also be modified to grant staff members limited access to the following:
- Programs
- Forms
- Assessments
- Client Groups (via the People Page)
- Reports (via the system navigation bar)
Limited access means that the staff members assigned to this Role will be able to interact with the feature as indicated by the Role Permission, but only with specific items selected during Role setup. For example, a Role may have access to the Programs tab in client records, however, they can only interact with Programs that are appropriate for their day-to-day duties. For example, an organization may have a Substance Abuse Specialist Role in which the only program the assigned staff may enroll clients is a "Substance Abuse" program.
Building a Role and Setting Permissions From Scratch
This section will walk you through creating a Role from start to finish.
If you prefer video walkthroughs, see VIDEO: Agency Admin - Roles and Permissions.
- Create Role and Set Role Permissions
- Create Intake Tab(s)
- Assign Limited Access
- Assign Navigator(s) to Role
- Use Created Role as Template for Additional Roles
Create Role and Set Role Permissions
Remember: begin by creating the Role with the most access first. This will provide an easy template from which you can create any additional Roles.
- Click Agency Admin from the system navigation bar
- Click Permissions
- Enter Role Name
- From the list of Role Permissions, select the checkbox next to each you wish this Role to have access
- Scroll down and click Save settings
- Role will appear in a tab listed on the left
back to Building a Role and Setting Permissions back to top
Create Intake Tab(s)

- Click the Tabs toggle
- Click Create Tab - a screen overlay will appear
- Enter the Tab Name in the text field
- Click Create
- Tab box will appear in main screen
- From the list of System or Custom intake fields to the left, locate the field you wish to add to the intake page
- Click and drag the intake field to the named tab box - the "Basic" intake field contains client name and contact information, the "Information" intake field contains addresses, birth date, and social security number
- Repeat steps 6 and 7 as needed for the initial tab - if you wish to create additional intake tabs, repeat steps 2-7
- As you go or once all tabs and intake fields have been added, you can rearrange the order of each as desired by clicking and dragging the
 handle of each element
 - When finished, click Save located to the right
back to Building a Role and Setting Permissions back to top
Assign Limited Access
If the Role does not require limited access, continue to Assign Navigator(s) to Role.
The steps to assign limited access to Programs, Forms, Assessments, Client Groups, and Reports are the same. On each toggle's settings page, there will be two sections:
Available on the left, and Assigned on the right.
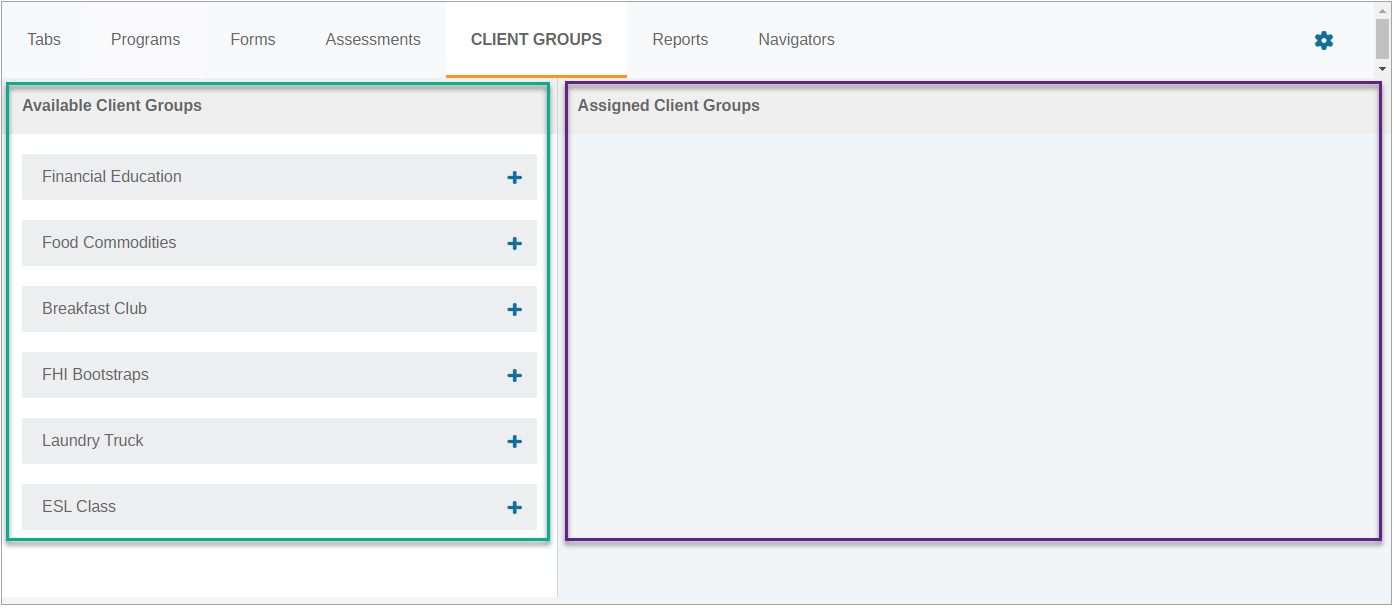
- All of your organizations elements for that toggle (Programs, Forms, Assessments, etc.) will be listed on the left under Available
- The right side, Assigned, will be blank by default. If Assigned is left blank, this Role will have access to all Available elements.
- Do not select all Available elements if you wish this Role to have full access - Leave the Assigned area(s) blank and continue to Assign Navigator(s) to Role.
- Any elements you wish to be assigned to this Role must be selected from the list of available elements
Follow the steps below and be sure for the first step you select the corresponding toggle.

- Click the toggle for the area you wish to assign limited access
- From the list of Available items on the left, click to select which you wish to Assign (grant access to) for this Role
- Selected elements will be moved under Assigned
- Click Save when finished
- Repeat as necessary for any other toggle
back to Building a Role and Setting Permissions back to top
Assign Navigator(s) to Role

- Click the Navigators toggle
- From the list of System Navigators on the left, click which staff members you wish to assign to this Role
- Staff name is moved to Assigned Navigators and is assigned to the Role
back to Building a Role and Setting Permissions back to top
Use Created Role as Template for Additional Roles
Creating new Roles from an existing one is best if you have already created the Role that has the most access to eLogic Genesis. If you haven't yet created a Role, see Create Role and Set Role Permissions.
Begin under Agency Admin → Permissions
- Click Create New Role
- Enter Role Name
- Scroll down and click Save settings
- Role will appear in a tab listed on the left
- The drop-down list Copy Settings from existing role will appear to the right of the list of Role Permissions
- Click the drop-down and select the Role you created previously
- Click Copy Settings
- All Role Permissions, Tabs and Intake Fields, Program, Forms, Assessments, Client Groups, and Reports settings from the other Role will be copied to the current Role
- Check Role Permissions and select/deselect any applicable changes
- Scroll down and click Save settings
- Click the Tabs toggle
- Make any appropriate changes for this Role - changes could include removing intake field options, intake tabs, creating a new tab, adding additional intake options
- When completed, click Save to the right
- Assign Limited Access if necessary
- Assign Navigators to Role as appropriate
back to Building a Role and Setting Permissions back to top
Copy Settings from Existing Role to Another Role
- Click Agency Admin from the system navigation bar
- Click Permissions
- From the list of tabs on the left, select which Role you wish to copy another Role's settings to
- Click the Copy Settings from existing role drop-down and select the Role you created previously
- Click Copy Settings
- All Role Permissions, Tabs and Intake Fields, Program, Forms, Assessments, Client Groups, and Reports settings from the other Role will be copied to the current Role
Assign Navigator(s) to Role
Note: Staff can only be assigned to one Role at a time. If a navigator needs Role Permissions from multiple Roles, we encourage you to create a new Role.
A navigator's assigned Role can also be updated under the Navigators tab.
- Click Agency Admin from the system navigation bar
- Click Permissions
- From the list of tabs on the left, select which Role you wish to assign a navigator
- Click the Navigators toggle
- Under System Navigators on the left, locate and click the navigator you wish to assign to this Role - if navigator was assigned to another Role, they will be removed from that Role and assigned to the new Role selection
Unassign Navigator(s) from Role
Note: Navigators must be assigned a Role to login to eLogic Genesis. Removing a navigator from a Role and not assigning them a new Role will lock their account until a new Role is assigned.
A navigator's assigned Role can also be updated under the Navigators tab.
- Click Agency Admin from the system navigation bar
- Click Permissions
- From the list of tabs on the left, select which Role you wish to unassign a navigator
- Click the Navigators toggle
- Under Assigned Navigators on the left, locate the navigator you wish to unassign from this Role
- Click the
 delete icon
 - Navigator is unassigned from Role
Delete Role
Note: Deleting a Role will delete all Role settings. If you wish to keep the Role and all its settings, unassign all navigators from that Role and assign to another one.
- Click Agency Admin from the system navigation bar
- Click Permissions
- From the list of tabs on the left, select which Role you wish to delete
- Scroll to the bottom of the Role Settings page
- Click Delete role (including all settings)
Comments
0 comments
Please sign in to leave a comment.